
See an Aurora Australis (Southern Lights)
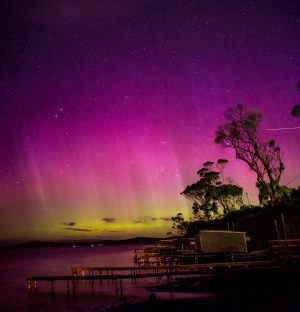
The Aurora Australis is the Southern hemisphere version of the Aurora Borealis that our Northern hemisphere friends see. We like to venture out at night under the stars and photograph the Aurora Australis (also known as the Southern Lights). All the Aurora photographs on this website have been taken by us, with many taken within 10 minutes of The Beach Escape. Why not check out our video of our Aurora and night sky photography journey.
So if you are looking for accommodation in a spot great for seeing/photographing an Aurora when it is active, then we think The Beach Escape is a great location to base yourself as it is close by to some great spots. Need convincing? Then take a look at our image gallery to see for yourself!
What is an Aurora?
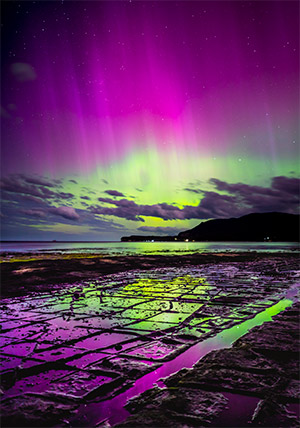
An Aurora is a coloured light display in the night sky (typically green / pink / red / purple) caused by charged particles from the sun interacting with the upper atmosphere of our planet. Coronal Hole High Speed Stream (CH HSS) and Coronal Mass Ejections (CME) associated with flares launching off the sun's surface are common causes of these particles being hurled towards us.
When is the best time to view an Aurora?
Auroras are a fickle thing - we can go months without any activity and then we might have a number of nights in a row where we see mother nature put on a show. It all depends on a number of different factors aligning (sun being active / atmospheric conditions / weather) for a display to be visible. There is no "best" time to see an Aurora as they happen all year round, although winter has more hours of darkness which may increase the chance of seeing one.
There is no hard and fast rule in accurately predicting when an Aurora will occur, how strong it will be, or even if it will be visible, as unfortunately it is not an exact science. There are organisations who monitor the sun for solar activity (active sun spots / coronal holes / coronal mass ejections) that may have an impact us on earth (really strong solar events can cause issues with GPS, communications and power grids), and these events also cause Auroras. If an event occurs that may impact earth, then a alert is issued - however there is never a 100% guarantee that something will happen. From this alert we are given an estimated time of impact, however this this can be plus or minus 12 hours in range. The only really accurate warning we get is when the sensors on a special satellite orbiting earth detect something passing it. If this occurs than we then have approximately 45 minutes to grab a camera and get to our favourite spot ready for action.
Another thing to note is that the sun goes through an approximate 11 year solar activity cycle where it goes goes from minimal activity to peak activity and back to minimal again. Aurora producing sun spots / CME's are most common during around the solar maximum (peak) and less frequent around the solar minimum. We are currently heading towards solar minimum at the end of cycle 24 so Aurora activity has declined - this is one of the quietest cycles in over a century. Never fear, we still get Aurora's produced by coronal holes and the occasional coronal mass ejection, and some of the big Aurora events have occurred during a solar minimum - it is just the frequency is lower.
The Further information section below has some links to websites that provide Aurora information. We highly recommend you join the Aurora Australis Tasmania Facebook group as its members are fantastic at helping out others and letting everyone know when an Aurora may or is occurring.
What does an Aurora look like?
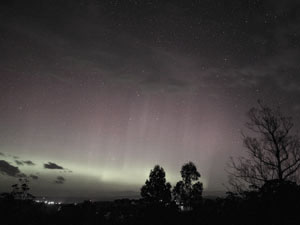
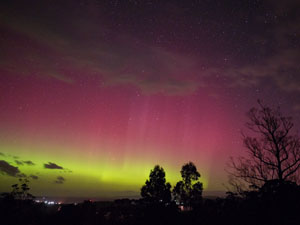
What you will see depends on a number of factors that we won't go into here, however in terms of what you will see with your eyes from Tasmania, it is almost never like you see in photos. Whilst a good camera will pick up the strong colours (green / red / purple etc), our eyes may only pick up a dull glow in the sky, and the glow may dancing around on the horizon. Occasionally it may flare up and you might see a trace of green in the sky and it could become quite bright. Looking at the two similar pictures, the first one is as the camera captured it. The second one is adjusted to provide a representation of how our eyes perceived it. So don't expect to see glorious colours in the sky as you will be disappointed. A camera however will capture a lot more then our eyes will see. When Aurora hunting remember to get as far from bright light sources as possible - this includes cities and towns - as this will give you the best chance to see the lights of an Aurora. Also remember to let your eyes adjust to the darkness as you will see the Aurora more clearly.
Where are the best locations to view an Aurora?
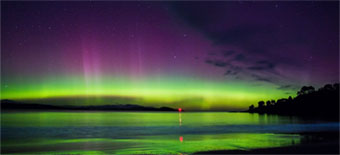
In Tasmania, the best spots to view an Aurora are those that have a clear outlook south to the horizon and are well away from strong light sources like cities and street lights. If you are attempting to photograph an Aurora, it is also good to have something that you can frame your photo with in the foreground. Personally we like to have still water in the foreground as the light from the Aurora reflects from it.
At The Beach Escape there are a number of locations that we like that are close by. These include:
Primrose Sands beach (2 min walk)
The Gypsy Bay boat ramp (this does have a strong light source nearby however it can add to the composition of a photo) (2 min drive)
The hills around Primrose Sands (5 min drive)
Carlton beach (15 min drive)
Dunalley beach (15 min drive)
Eaglehawk Neck (30 min drive)
Please have a look at our image gallery for examples of some of the locations near The Beach Escape.
What do I need to photograph an Aurora?
There are lots of cameras that are capable of photographing an Aurora to varying degrees. In general you need a camera that has manual mode, can take long exposures (15-30 seconds) and preferably can shoot in RAW format so that you can adjust the image later if required (RAW files allow you to alter the image significantly). You also need a tripod to keep the camera still.
Just as important as the camera, or even more so, is the lens you use. In general you want a lens with a low F number (the amount of light it lets through) and that is as wide as possible. Lets look at the F number - lenses have anumber that indicates how much light they let through to the camera sensor. For Aurora's you preferably want a lens with an F number of 2.8 or lower. The brighter the lens the less time you need to expose the photo. The second consideration is the width of lens - the wider better as more of the scene the lens can captured in the photo (and the less chance of star trails). Lenses are specified with a millimetre range, and the lower you can get the better. In general under 24mm is sufficient, although we shoot at 34mm. Now if you don't have a lens that meets these criteria don't let this put you off - you may not capture bright pictures similar to those you may have seen, however you could still get something.
When preparing to go out, make sure your camera battery (and any spares) are charged, and take your smart phone so you can monitor what is happening via the Facebook groups. We find it easier to set the camera up with necessary settings before heading out (manual mode, manual focus, low F number etc). Also don't forget to take warm clothes, lights / head lamps and something to drink and even a friend! Also tell someone where you are going.
How do I photograph an Aurora?
How you set up and use your camera is different depending on the camera and lens combination that you are using however the same general principles apply.
Set up your tripod and camera in a position with a good view south and away from strong light sources.
Switch your camera to manual mode.
If you can, setup the camera to save images in JPG and RAW format (only use RAW if you have the software to edit them).
Set the aperture as wide as you can (the F number - as low as it will go).
Zoom out as far as possible.
Try and focus on a distant object (such as a star). You may need to focus the camera manually.
Set the exposure time (how long the photo takes) to about 30 seconds as a starting point.
Take the photo. If you have a remote shutter release or can control your camera via Wi-Fi then use that, as physically pressing the button on the camera can cause it to shake and blur the photo.
Review the results and adjust the settings as required - if possible lower the exposure time as if you have it too long then you will end up with blurry stars.
Try again - Auroras can flare up and die down quickly so don't stop trying.
Occasionally check your focus as things can change over time.
And don't forget - practice makes perfect! If you don't succeed the first time, don't give up - it can be a rewarding experience!
If you have any questions please feel free to contact us and we will gladly see if we can assist you.